This bread has been a life changer for me! I love bread, but I have dairy and egg allergies. I can’t buy bread from the store, because they often use eggs, milk or butter, not to mention the processed sugar! As women with PCOS we all know that processed sugars are not our friend. It can lead to diabetes since we are already at risk just by having PCOS.
I had to find a way to make bread that wouldn’t require me to spend hours in the kitchen. The only thing spending hours in the kitchen is the bread itself. Because we don’t knead it we let the bread sit over night with a towel draped over it. I keep my in the oven, just because I have cats who might try to sneak under that towel. And there is the added benefit that the oven will keep the moisture generated by the yeast that we use.
I have made two different versions with this recipe. One was with sesame seeds, pecans, chia seeds and pumpkin seeds. The other one I went for a vegan olive cheese bread. Did I mention I’m allergic to dairy? And PCOS women shouldn’t consume dairy anyway, sooooo I tried to replicate the flavor of breads with cheese in them. Not exactly the same, but I liked the flavor. I still need to do more experimenting with that one, so I will share the first one only. The recipe I used is from The Awesome Green and it’s called the No Knead Bread with Buckwheat, Rye, Seeds and Nuts. Have you been to her site yet? I love it! Great photos and fun posts…unlike mine, but anyway! I just had to share this recipe, because it’s too good not to!
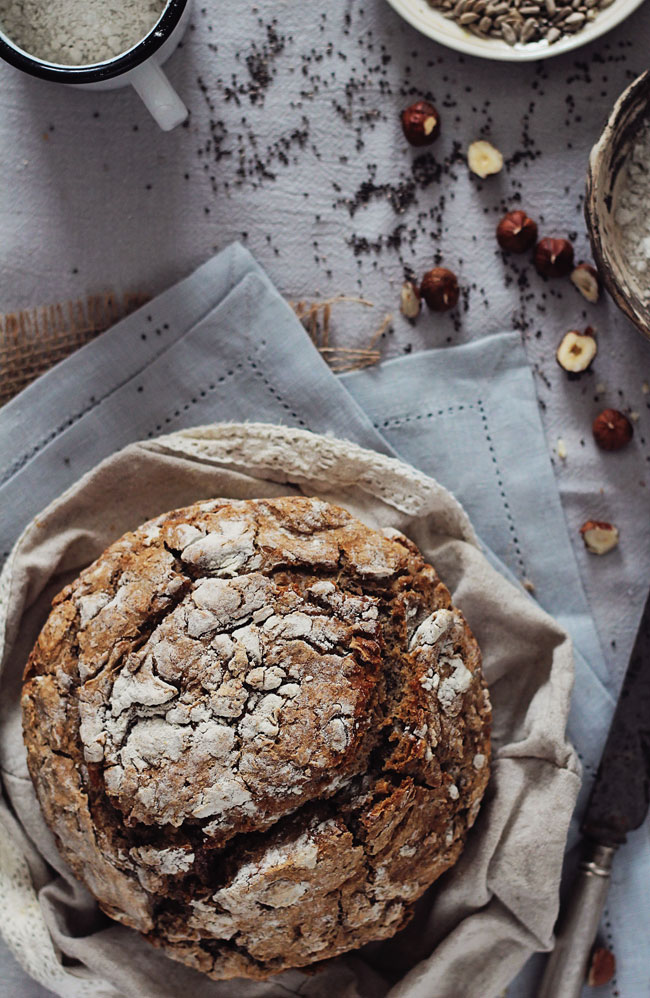
Photo Courtesy of The Awesome Green
All you have to do is mix all the ingredients together and then cover it. Keep it in a slightly warm place, this is why I used my oven. Whatever heat the dough would generate would stay in the oven and it helps it to keep the moisture. Which is really important if you use coconut flour like I do.
Now let’s get to the recipe!
No-Knead Bread with Buckwheat, Rye, Seeds and Nuts
Total time
15 hours 10 mins
Author: The Awesome Green
Cuisine: Vegan
- 2 cups whole-wheat flour (wholemeal)*
- 1 cup buckwheat flour*
- 1 cup rye flour*
- 1 tbsp chia seeds
- ½ cup toasted hazelnuts
- ½ cup walnuts
- ½ cup toasted sunflower seeds
- ¼ tsp instant yeast
- 1 tsp salt
- 1&1/2 cups filtered water
- *extra flour to sprinkle the working surface and bowl
- In a large bowl combine flour, yeast, salt, nuts and seeds, then add water.
- Stir to combine and obtain a sticky dough.
- Cover the bowl with a clean towel and let the dough rise at room temperature for for 12 hours (until bubbles appear on its surface).
- Sprinkle a working surface with flour, transfer the dough on it, fold it once or twice and give it a ball shape.
- Sprinkle abundantly the bowl with flour, place the dough inside, cover with a clean towel and let it rise for two more hours (it should double its size).
- With about 20 minutes before the dough is ready, heat the oven at 220ºC/450ºF and place a cast-iron pot or a clay one into the oven, empty, to accumulate heat.
- Remove the pot from the oven, carefully transfer the dough into it, cover with a lit and bake for 30 minutes.
- Remove the lid and bake for 40 more minutes.
- Remove from the pot and let cool for a 10 minutes before slicing.
I subbed half buckwheat and half coconut flour when I didn’t have rye flour or whole wheat flour and it worked well! Just remember to keep adding water until the dough sticks to itself and feels sticky, otherwise it will just be a crumbly mess. It’s best to use 1 cup coconut flour, 1 cup rye flour and 1 1/2 cup buckwheat flour. Add the amount of water recommended in the recipe, but if it falls apart add more. Like I said before keep adding water a little bit at a time until it sticks together and it starts to feel sticky. Then place in the oven (off!) and leave it over night.
I don’t have a pot with a lid that can be baked, so I use a frying pan that can be baked and cover it with aluminum foil. It works great!
Don’t be afraid to experiment with what you throw in. I’ve used sesame seeds, olives, nutritional yeast and it turns out great. Find the flavors you like in your bread to switch things up.
Let me know how it works out! Happy baking!

Photo courtesy of The Awesome Green.